Open Graph Image Generator

这节我们来用 Next.js 提供的 og 功能用 React 的方式编写一个 Open Graph 图片生成函数。

这部分的内容在 Next.js 文档描述不明朗,你应该前往 Vercel 的文档中查看更多信息,下面是覆盖常用应用场景的 Demo。

什么是 Open Graph Image

Open Graph Image 是一种网页标记的一部分,属于 Open Graph 协议的一部分。这个协议最初由 Facebook 开发,用于控制社交媒体平台上分享链接时显示的内容。当你在社交网络上分享一个链接时,Open Graph 协议允许网站管理员定义如何展示该链接的标题、描述以及图像。

特别地,Open Graph Image 标签 (og:image) 定义了当链接被分享到社交媒体时,应该显示哪张图片。通过在 HTML 代码中添加此标签,可以指定一个图片的 URL,社交媒体平台在显示链接预览时就会使用这个图片。

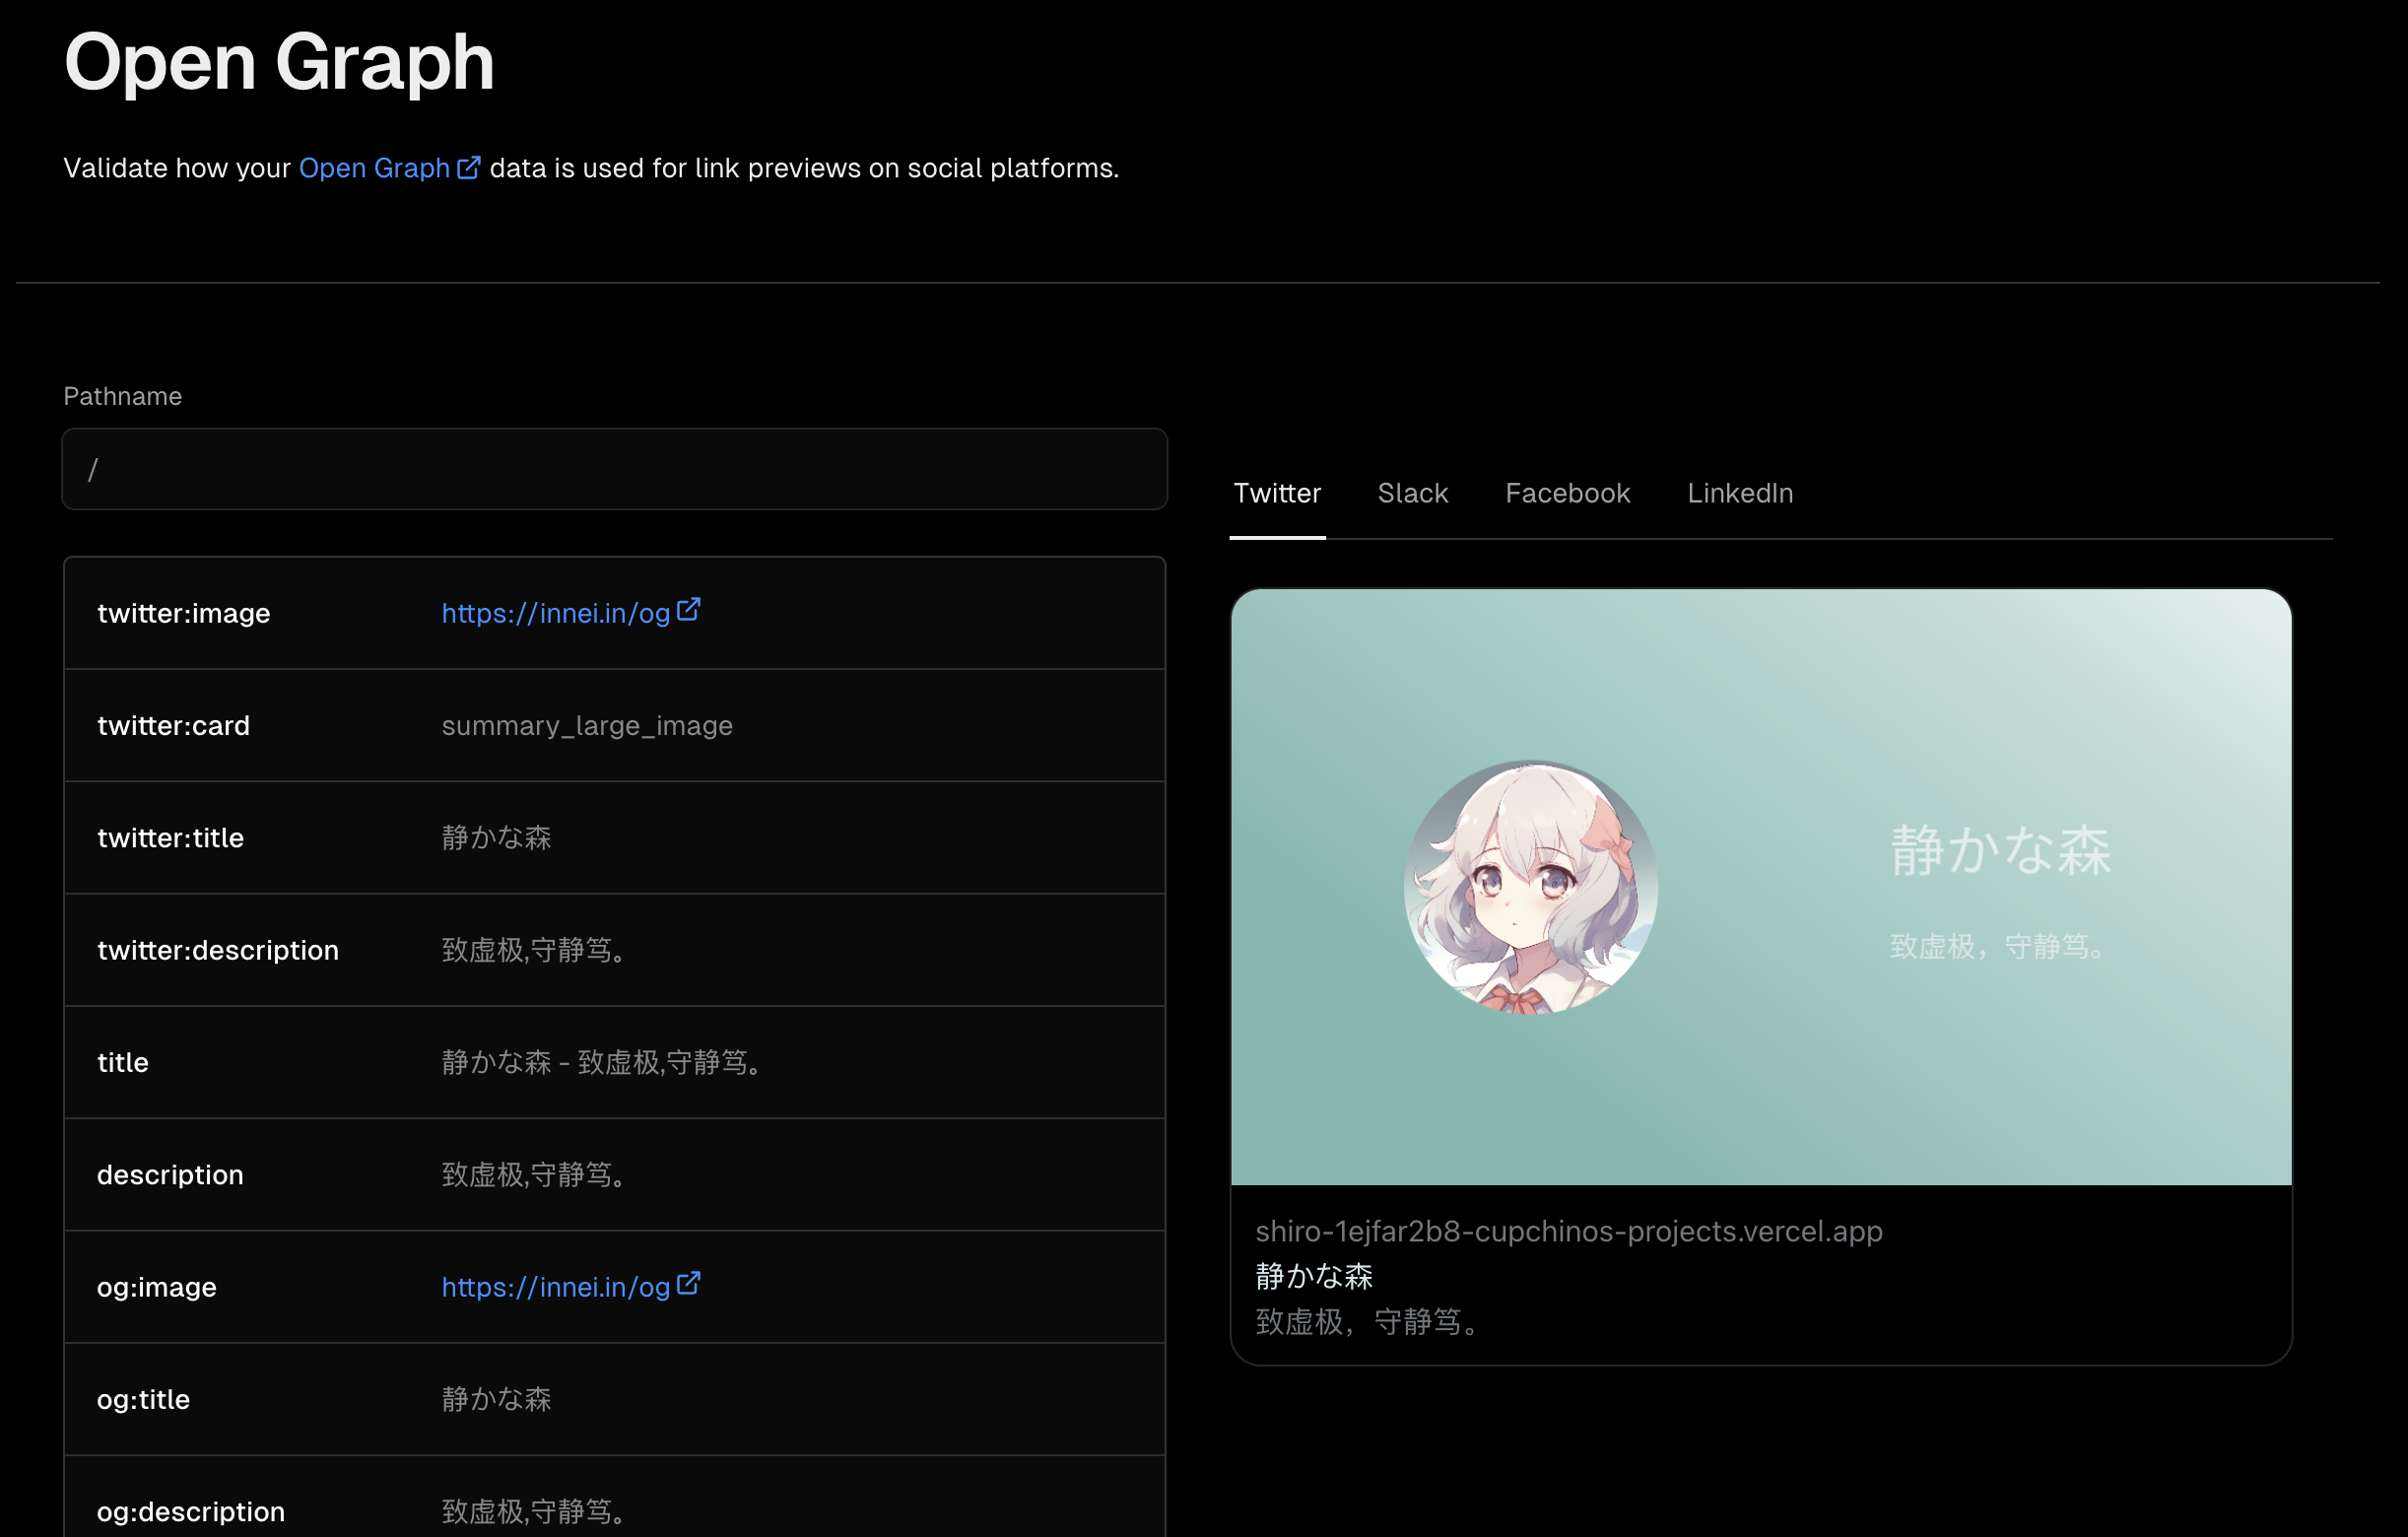
例如。在我的站点中包含以下的 Open Graph Image 标签:

<meta property="og:image" content="https://innei.in/og" />

那么,在 Twitter 中的显示的效果就是:

基础 UI 的绘制

首先,新建 Route handler 文件 /api/og/route.tsx,并在其中添加以下代码:

/api/og/route.tsx
import { ImageResponse } from 'next/og'
import type { NextRequest } from 'next/server'

export const runtime = 'edge'

export const GET = async (req: NextRequest) => {
  const bgAccent = '#95cb9d'
  const bgAccentLight = '#d9ecdc'
  const bgAccentUltraLight = '#eef7ef'
  const avatar = 'https://cdn.jsdelivr.net/gh/Innei/static@master/avatar.png'
  const seo = {
    title: 'Innei',
    description: 'I am a web developer',
  }
  return new ImageResponse(
    (
      <div
        style={{
          display: 'flex',
          height: '100%',
          width: '100%',
          background: `linear-gradient(37deg, ${bgAccent} 27.82%, ${bgAccentLight} 79.68%, ${bgAccentUltraLight} 100%)`,
          fontFamily: 'Noto Sans, Inter, "Material Icons"',
          padding: '5rem 15rem',
          alignItems: 'center',
          justifyContent: 'space-between',
        }}
      >
        <img
          src={avatar}
          style={{
            borderRadius: '50%',
          }}
          height={256}
          width={256}
        />

        <p
          style={{
            display: 'flex',
            flexDirection: 'column',
          }}
        >
          <h3
            style={{
              color: '#ffffff99',
              fontSize: '3.5rem',
            }}
          >
            {seo.title}
          </h3>
          <p
            style={{
              fontSize: '1.8rem',

              color: '#ffffff89',
            }}
          >
            {seo.description}
          </p>
        </p>
      </div>
    ),
  )
}

现在访问 /og 就会生成一个这样的图片了。

上面的例子中,全部使用了内联的 CSS 样式,我们也可以直接使用 Tailwind 规范的 CSS 原子类名。(此功能是实验性的,但是一般可以正常工作)。

api/og/route.tsx
import { ImageResponse } from 'next/og'
import type { NextRequest } from 'next/server'

export const runtime = 'edge'

export const GET = async (req: NextRequest) => {
  const bgAccent = '#95cb9d'
  const bgAccentLight = '#d9ecdc'
  const bgAccentUltraLight = '#eef7ef'
  const avatar = 'https://cdn.jsdelivr.net/gh/Innei/static@master/avatar.png'
  const seo = {
    title: 'Innei',
    description: 'I am a web developer',
  }
  return new ImageResponse(
    (
      <div
        style={{
          background: `linear-gradient(37deg, ${bgAccent} 27.82%, ${bgAccentLight} 79.68%, ${bgAccentUltraLight} 100%)`,
          fontFamily: 'Noto Sans, Inter, "Material Icons"',
          padding: '5rem 15rem',
        }}
        tw="flex h-full w-full items-center justify-center"
      >
        <img src={avatar} tw="rounded-full" height={256} width={256} />

        <p tw="flex flex-col">
          <h3
            style={{
              color: '#ffffff99',
              fontSize: '3.5rem',
            }}
          >
            {seo.title}
          </h3>
          <p
            style={{
              fontSize: '1.8rem',

              color: '#ffffff89',
            }}
          >
            {seo.description}
          </p>
        </p>
      </div>
    ),
  )
}

需要注意的是,这里使用的是 tw= 属性而不是 className。并且此 Tailwind 样式不会受到项目的 Tailwind 配置文件而改变。

Important

注意到,这里我们使用了 runtime = 'edge',在 Next.js 中,API Handler 有两种不同的运行时,默认为 nodejs,另一种则为 edgeedge 运行时比 nodejs 效率更高效,并且借助 Vercel 边缘网络可以更快的服务用户,但是此环境下仅支持一些 Node.js 的核心模块,所以我们需要注意这一点。

参考:Edge and Node.js Runtimes

下面的例子中,我们都以 Edge Runtime 为例,在 Node.js 和 Edge 中对于请求的处理方式是不同的,例如在 Edge 中只能使用 fetch 模块去获取数据,而在 Node.js 中可以使用 fs 模块去读取文件或者使用 XMLHTTPRequest 去请求外部数据。

资源加载

在 Edge 环境中,我们只能使用 fetch 去获取外部数据或者资源。

加载本地图片

我们可以使用 fetch 去加载一个本地的图片。

现在假设我们在同级目录下存在一个图片文件 next.png

import { ImageResponse } from 'next/og'

import { SEO } from '~/app.config'

export const runtime = 'edge'

export async function GET() {
  const imageData = await fetch(new URL('./next.png', import.meta.url)).then(
    (res) => res.arrayBuffer(),
  )

  return new ImageResponse(
    (
      <div
        style={{
          display: 'flex',
          background: '#f6f6f6',
          width: '100%',
          height: '100%',
          flexDirection: 'column',
          justifyContent: 'center',
          alignItems: 'center',
        }}
      >
        {/* @ts-expect-error */}
        <img src={imageData} width={300} />

        <div tw="mt-18 text-4xl">{SEO.title}</div>
      </div>
    ),
  )
}

需要注意的是,在导入图片时,我们使用了 new URL('./next.png', import.meta.url),这是因为在 Edge 环境中,我们无法使用相对路径去加载文件,所以我们需要使用 new URL 去获取文件的绝对路径。另外我们也无法使用 fs 或者直接 import 去加载文件。

获取到图片之后,我们可以直接使用 arrayBuffer 去获取图片的二进制数据,然后直接使用这个数据去渲染图片,这里直接把图片的二进制数据作为 src 属性传递给 img 标签,虽然会导致 TypeScript 报错,但是实际上是可以正常工作的。

我们可以传入 height 或者 width 任意一个值去对图片进行缩放。

Warning

在对图片进行缩放时,需要注意图片的缩放比例保持整数,比如原图片高为 1024,缩放后为 512,这是 2x 缩放。如果缩放比例不是整数,会导致渲染之后的图片出现模糊和锯齿。

这一节的文档对应部分为:Open Graph (OG) Image Examples - using-a-local-image

获取远程字体

在 Vercel 的 Edge 环境中,每个函数的大小被限制为 1MiB(Hobby Plan)。但是任何一个包含常用汉字的字体都会在 3MiB 以上,所以我们可以利用 fetch 去获取远程的字体文件,然后使用这个字体文件去渲染文字,例如下面我们加载远程的小赖字体。

Important

在 Vercel 中,入站流量和出站流量一样都会被计费,所以再生成动态 OG 时,请注意缓存已生成的图片,避免入站流量过大。

import { ImageResponse } from 'next/og'

const fontNormal = fetch(
  'https://github.com/lxgw/LxgwWenKai/releases/download/v1.320/LXGWWenKai-Regular.ttf',
).then((res) => res.arrayBuffer()) // 如果遇到  `failed to pipe response Error: Unsupported OpenType signature Not ` 则有可能是字体下载错误

export const runtime = 'edge'

export const GET = async () => {
  try {
    const fontData = await fontNormal

    const bgAccent = '#95cb9d'
    const bgAccentLight = '#d9ecdc'
    const bgAccentUltraLight = '#eef7ef'
    return new ImageResponse(
      (
        <div
          style={{
            display: 'flex',
            height: '100%',
            width: '100%',
            background: `linear-gradient(37deg, ${bgAccent} 27.82%, ${bgAccentLight} 79.68%, ${bgAccentUltraLight} 100%)`,
            fontFamily: 'LXGW WenKai Screen R',
            alignItems: 'center',
            justifyContent: 'center',
          }}
        >
          <div
            style={{
              fontSize: '3rem',
              color: 'white',
            }}
          >
            小赖字体
          </div>
        </div>
      ),
      {
        width: 1200,
        height: 600,
        fonts: [
          {
            name: 'LXGW WenKai Screen R',
            data: fontData,
            weight: 400,
            style: 'normal',
          },
        ],
      },
    )
  } catch (e: any) {
    return new Response(`Failed to generate the OG image. Error ${e.message}`, {
      status: 500,
    })
  }
}

效果为 小赖字体

加载本地字体

和加载本地图片一样,我们也可以使用 fetch 去加载本地的字体文件。在上一节的基础上,我们只需要修改这些。

api/og/route.tsx
import { ImageResponse } from 'next/og'

const fontNormal = fetch(
  new URL('./LXGWWenKai-Regular.ttf', import.meta.url).toString(),
).then((res) => res.arrayBuffer())

export const runtime = 'edge'

export const GET = async () => {
  try {
    const fontData = await fontNormal

    const bgAccent = '#95cb9d'
    const bgAccentLight = '#d9ecdc'
    const bgAccentUltraLight = '#eef7ef'
    return new ImageResponse(
      (
        <div
          style={{
            display: 'flex',
            height: '100%',
            width: '100%',
            background: `linear-gradient(37deg, ${bgAccent} 27.82%, ${bgAccentLight} 79.68%, ${bgAccentUltraLight} 100%)`,
            fontFamily: 'LXGW WenKai Screen R',
            alignItems: 'center',
            justifyContent: 'center',
          }}
        >
          <div
            style={{
              fontSize: '3rem',
              color: 'white',
            }}
          >
            小赖字体
          </div>
        </div>
      ),
      {
        width: 1200,
        height: 600,
        fonts: [
          {
            name: 'LXGW WenKai Screen R',
            data: fontData,
            weight: 400,
            style: 'normal',
          },
        ],
      },
    )
  } catch (e: any) {
    return new Response(`Failed to generate the OG image. Error ${e.message}`, {
      status: 500,
    })
  }
}

缓存

一般的,在生成的 OG 会被 Vercel 缓存。但是这个缓存的不可控性和 Vercel 的流量非常的昂贵。我们可以设置 OG 图片响应的 HTTP 缓存标头控制缓存的配置。

api/og/route.tsx
import { ImageResponse } from 'next/og'

export const runtime = 'edge'

export const GET = async () => {
  try {
    const bgAccent = '#95cb9d'
    const bgAccentLight = '#d9ecdc'
    const bgAccentUltraLight = '#eef7ef'
    return new ImageResponse(
      (
        <div
          style={{
            display: 'flex',
            height: '100%',
            width: '100%',
            background: `linear-gradient(37deg, ${bgAccent} 27.82%, ${bgAccentLight} 79.68%, ${bgAccentUltraLight} 100%)`,
            alignItems: 'center',
            justifyContent: 'center',
          }}
        ></div>
      ),
      {
        width: 1200,
        height: 600,
        headers: new Headers([
          [
            'cache-control',
            'max-age=3600, s-maxage=3600, stale-while-revalidate=600',
          ],
          ['cdn-cache-control', 'max-age=3600, stale-while-revalidate=600'],
        ]),
      },
    )
  } catch (e: any) {
    return new Response(`Failed to generate the OG image. Error ${e.message}`, {
      status: 500,
    })
  }
}
Important

上面的例子是官方文档总提到的方法,但是在 Next.js v14.1.3 版本或跟旧的版本中(也可能存在与未来的版本),此方法不生效。

我们可以使用 middleware.js 去重写这个路径的响应。首先建立 src/middleware.ts 添加下面的代码。

src/middleware.ts
import { NextResponse } from 'next/server'
import type { NextRequest } from 'next/server'

export function middleware(request: NextRequest) {
  if (request.nextUrl.pathname == '/og') {
    return NextResponse.rewrite(request.nextUrl, {
      headers: new Headers([
        [
          'cache-control',
          'max-age=3600, s-maxage=3600, stale-while-revalidate=600',
        ],
        ['cdn-cache-control', 'max-age=3600, stale-while-revalidate=600'],
      ]),
    })
  }
  return NextResponse.next()
}

上面的代码中,当路径命中 /og,那么,重写响应,添加缓存标头。

另外,你也可以使用 vercel.json 去控制其他路径的 HTTP 标头,比使用 middleware.js 更加方便。这部分的内容可以在 缓存标头和利用边缘网络加速访问 了解更多。

参考

这节内容的对应文档位于:Open Graph (OG) Image Generation

OG 生成器的演练场可以访问 OG playground

上面的 DEMO 位于: nextjs-book/tree/main/demo/og


最后更新于 2024/4/27 20:14:01

更新历史

本书还在编写中..

前往 https://innei.in/posts/tech/my-first-nextjs-book-here#comment 发表你的观点吧。